Vuetify with Flask 101

20년전에 드림위버 그리고 그냥 javascript, flash 등으로 웹싸이트만들어서 판매한 경험이 있습니다.. ㅎㅎ 정말 오래되었고 녹슬었죠.
최근에 앱 만들어야 하는 상황이 생겨서 다시 꺼내들게 되었습니다.
전문 프론트엔드 개발자도 아니고 그냥 빠르게 개발할 필요가 있어서 learning curve 가 React 보다 좀 더 덜한 Vue를 사용하게 되었습니다.
아래의 내용은 제가 아는 내용을 쓴 것이 아니라 Developing a Single Page App with Flask and Vue.js
페이지에서 직접 해보면서 다시 정리한 내용입니다. (내용은 거의 모두 같습니다.)
1. Setting Up
1.1 Vue CLI 설치
sudo npm install -g @vue/cli1.2 Vue Project 생성
vue-app 이라는 이름을 프로젝트를 만들려면 vue create 명령어 사용
$ vue create vue-app

? Please pick a preset: (Use arrow keys)
   ❯ Manually select features  (선택)
? Check the features needed for your project:
   ❯ ◉ Router  (스페이스 눌러서 추가. 엔터키는 다음으로 그냥 넘어감)
? Choose a version of Vue.js that you want to start the project with (Use arrow keys)
   ❯ 2.x
? Use history mode for router? (Requires proper server setup for index fallback in production) (Y/n)
   ❯ Y
? Pick a linter / formatter config:
   ❯ ESLint + Airbnb config
? Pick additional lint features: (Press <space> to select, <a> to toggle all, <i> to invert selection)
   ❯ ◉ Lint on save
? Where do you prefer placing config for Babel, ESLint, etc.?
   ❯ In package.json
? Save this as a preset for future projects? (y/N)
   ❯ N
설치 완료후 vue-app 디렉토리로 이동.
서버를 실행합니다.
$ cd vue-app
$ tree -I node_modules
├── babel.config.js
├── package.json
├── public
│         ├── favicon.ico
│         └── index.html
├── README.md
└── src
    ├── App.vue
    ├── assets
    │         └── logo.png
    ├── components
    │         └── HelloWorld.vue
    ├── main.js
    ├── router
    │         └── index.js
    └── views
        ├── About.vue
└── Home.vue| File Path | Description |
|---|---|
| public/index.html | Vue Application의 시작 포인트이며 <div id="app"></div> 에 HTML이 추가가 됩니다. |
| src/main.js | Vue App 의 entry point 로서 new Vue(...) 으로 Vue를 초기화 합니다. |
| src/App.vue | root component로서 다른 모든 components들이 여기에서부터 렌더링 됩니다. |
| src/components | UI Components가 존재합니다. |
| src/views | components 디렉토리와 동일하나, src/router/index.js 에서 주로 사용합니다. |
| src/router/index.js | URLS 과 components를 맵핑 시킵니다. |
| src/assets | statis assets (이미지, 폰트 등등)을 저장합니다. |
$ npm run servehttp://localhost:8080/ 에 들어가면 sample vue page가 떠 있는것을 확인 할 수 있습니다.
1.4 ESLint
프로젝트 최상위에 .eslintrc.js 파일을 만들어서 다음을 넣습니다.
module.exports = {
  extends: ['plugin:vue/essential', "@vue/airbnb"],
  rules: {
    'no-console': 'off',
  }
};
extends 에는 다음의 같은 옵션들을 넣을 수 있으며, 위일수록 강제력이 강합니다.
plugin:vue/essential: 모든 룰들을 강제함plugin:vue/strongly-recommended: Readibility 를 높입니다.plugin:vue/recommended: 최소화
1.3 Flask
sudo pip install --upgrade flask flask-corsapp.py 를 만들고 python app.py 로 실행합니다.
Flask는 자세한 설명은 생략하겠습니다.
다만 CORS 라이브러리가 사용되었는데, 해당 라이브러리는 cross-origin requests를 처리할 수 있도록 도와줍니다.
Cross-origin requests란 서버와 다른 domain 주소, IP Address, Port 에서 요청한 reqeusts 를 의미 합니다.
해당 예제에서는 동일한 localhost 에서 요청한 requests 더라도, port 가 서로 다르기 때문에 CORS 에러가 발생합니다.
from flask import Flask, jsonify
from flask_cors import CORS

app = Flask(__name__)
app.config.from_object(__name__)

# Enable CORS
CORS(app, resources={r'/api/*': {'origins': '*'}})


@app.route('/api/names', methods=['GET'])
def api_names():
    return jsonify({'names': ['사나', '미나', '나연', '정연']})


if __name__ == '__main__':
    app.run(port=5000)
2. Tutorial
2.1 views/Hello.vue
views/Hello.vue 에
<template>
  <div>
    <h1>처음 만드는 앱</h1>
    <p></p>
    <ul>
      <li v-for="name in names" v-bind:key="name"></li>
    </ul>
  </div>
</template>

<script>
export default {
  name: 'Hello',
  data() {
    return {
      msg: 'Hello! Anderson!',
      names: ['창민', '정아', '윤서', '윤아'],
    };
  },
};
</script>
2.2 src/router/index.js
router/index.js 에서는 VueRouter를 초기화하며, URLS 과 특정 view component를 연결시킵니다.
import Vue from 'vue';
import VueRouter from 'vue-router';

Vue.use(VueRouter);

const routes = [
  {
    path: '/hello',
    name: 'Hello',
    component: () => import('../views/Hello.vue'),
  },
];

const router = new VueRouter({
  mode: 'history',
  base: process.env.BASE_URL, // "/" 와 동일
  routes,
});

export default router;
2.3 src/App.vue
<template>
<div id="app">
<router-view/>
</div>
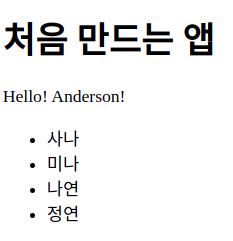
</template>http://localhost:8080/hello 에 접속하면 Hello! Anderson! 그리고 이름 리스트가 보일겁니다.

2.4 Asynchronous HTTP Call to Flask App
axios를 설치합니다.
$ npm install axiosHello.vue 의 script 부분을 다음과 같이 수정합니다.
<script>
import axios from 'axios';

export default {
  name: 'Hello',
  data() {
    return {
      msg: 'Hello! Anderson!',
      names: ['창민', '정아', '윤서', '윤아'],
    };
  },
  methods: {
    get_names() {
      const path = 'http://localhost:5000/api/names';
      axios.get(path)
        .then((res) => {
          this.names = res.data.names;
        })
        .catch((error) => {
          console.log(error);
        });
    },
  },
  created() {
    this.get_names();
  },
};
</script>
flask 백엔드 서버가 켜져 있는 상태에서 http://localhost:8080/hello 접속하면 아래의 그림처럼 보일 것 입니다.
2.3 Bootstrap
먼저 bootstrap을 설치합니다.
npm install bootstrapsrc/main.js 에 bootstrap.css 를 추가시킵니다.
import Vue from 'vue';
import App from './App.vue';
import router from './router';
import 'bootstrap/dist/css/bootstrap.css';
... 생략
src/App.vue 에 style 을 추가 합니다.
<style>
#app {
  margin-top: 50px;
  margin-left: 50px;
}
</style>
views/Hello.vue 에 Bootstrap 이 잘 되는지 버튼을 넣어 봅니다.
...생략 HTML 어딘가
<button type="button" class="btn btn-primary">버튼!</button>
...생략
3. Veutify
3.1 Setting Up Veutify
vue create my-app 을 할때
ESLint + Airbnb config선택하면 veutify에서 문제가 생기고 있다.
ESLint + Prettier로 진행하면 됨
$ vue create my-app
$ cd my-app
$ vue add vuetify
.eslintrc.js 파일은 다음과 같이 수정합니다.
- extends에 “plugin:vue/recommended” 를 삭제 했습니다. -> Pycharm 과 잘 안맞습니다.
module.exports = {
    root: true,
    env: {
        node: true,
    },
    extends: ["eslint:recommended", "@vue/prettier", "plugin:vue/base"],
    parserOptions: {
        ecmaVersion: 12,
        parser: "babel-eslint",
    },
    rules: {
        "no-console": process.env.NODE_ENV === "production" ? "warn" : "off",
        "no-debugger": process.env.NODE_ENV === "production" ? "warn" : "off",
    },
};
src/plugins/vuetify.js 는 다음과 같이 수정합니다.
import Vue from "vue";
import Vuetify from "vuetify/lib/framework";
import "vuetify/dist/vuetify.min.css";

Vue.use(Vuetify);

const opts = {};

export default new Vuetify(opts);