OpenVPN Server on Ubuntu
- Installation
- Public Key Infrastructure Setup - {:.} Certificate Authority (CA) Setup - {:.} Generate Certificates and Keys for the Server - {:.} Generate Certificates and Keys for Clients - {:.} Creating a Unified OpenVPN Profile for client Devices
- Simple Server Configuration
- Client - {:.} Open Internet Access - {:.} Routing

Installation
sudo apt install openvpn easy-rsaPublic Key Infrastructure Setup
먼저 PKI (Public Key Infrastructure)를 만들어야 합니다.
PKI는 다음과 같이 구성이 되어 있습니다.
- public key 그리고 private key
- master Certificate Authority (CA) certificate 그리고 각각의 서버와 클라이언트를 서명(sign)할 key
OpenVPN은 bidirectional authentication을 제공합니다. 즉 mutial trust가 만들어지기 위해서, 클라이언트는 서버를 authenticate해야하며, 서버또한 클라이언트를 authenticate해야 합니다. 서버 그리고 클라이언트 둘다 서로를 presented certificate이 master certificate authority(CA)에 의해서 signed이 되었는지 확인함으로서 authenticate를 합니다.
Certificate Authority (CA) Setup
나만의 Certificate Authority (CA)를 만들고 설정하는 방법은 다음과 같습니다.
sudo mkdir /etc/openvpn/easy-rsa/
sudo cp -r /usr/share/easy-rsa/* /etc/openvpn/easy-rsa/
sudo chown -R anderson:anderson /etc/openvpn/easy-rsa
mkdir /etc/openvpn/easy-rsa/keys
/etc/openvpn/easy-rsa/vars파일을 열고 다음을 수정하여 줍니다.
KEY_NAME 을 변경하면 server.key 그리고 server.crt 등의 이름으로 설정 파일들을 만들수 있습니다.
$ sudo vi /etc/openvpn/easy-rsa/vars

export KEY_COUNTRY="KR"
export KEY_PROVINCE="SEOUL"
export KEY_CITY="SEOUL"
export KEY_ORG="Anderson Co."
export KEY_EMAIL="a141890@gmail.com"
export KEY_OU="Anderson Dept"

# X509 Subject Field
export KEY_NAME="server"
Diffie-Hellman parameters 을 만들어야 합니다. (꽤 시간이 걸림)
openssl dhparam -out /etc/openvpn/dh2048.pem 2048cd /etc/openvpn/easy-rsa/
. ./vars. ./vars할때 .에 주의해야 합니다. 정확하게 . ./vars
NOTE: If you run ./clean-all, I will be doing a rm -rf on /etc/openvpn/easy-rsa/keys
위의 에러가 나오는데, keys디렉토리 안에 아무것도 없어서 나오는 warning이고, 신경쓸필요 없습니다.
./clean-all
./build-ca
clean-all을 통해서 혹시라고 old or example keys를 삭제 시킵니다.
build-ca를 실행시킬때, Country, State, Organization, Email등등 이미 기본값을 vars에다가 저장했으므로 그냥 엔터만 누르면 됩니다.
Generate Certificates and Keys for the Server
./build-key-server server
./build-dh
일반적으로 (common practice) /etc/openvpn/ 디렉토리 안에다가 certificates과 keys들을 위치시킵니다.
sudo cp /etc/openvpn/easy-rsa/keys/{server.crt,server.key,ca.crt} /etc/openvpnGenerate Certificates and Keys for Clients
일반적으로 각각의 클라이언트는 unique certificate 그리고 key를 갖는 것이 좋습니다.
By default, OpenVPN does not allow simultaneous connections to the server from clients using the same certificate and key. (See duplicate-cn in /etc/openvpn/server.conf.)
build-key 를 해줄때, client1, client2, client3 처럼 클라이언트마다 각각의
cd /etc/openvpn/easy-rsa
. ./vars
./build-key client1
cp /usr/share/doc/openvpn/examples/sample-config-files/client.conf /etc/openvpn/easy-rsa/keys/client.ovpn
client certificates이 만들어지면, client에서 scp명령어로 복사해옵니다. (hostname 변경필요)
$ scp -i ~/.ssh/ec2.pem ubuntu@hostname:/etc/openvpn/easy-rsa/keys/client* ~/Downloads/
$ scp -i ~/.ssh/dev.pem ubuntu@52.196.65.22:/etc/openvpn/easy-rsa/keys/ca* ~/Downloads/
완료가 되면 다음의 파일이 클라이언트에 있어야 합니다.
- client1.crt
- client1.key
- client.ovpn
- ca.crt
Creating a Unified OpenVPN Profile for client Devices
client.ovpn파일 안에 CA, client’s certificate 그리고 private key를 포함해서 손쉰게 client application으로 import가 될 수 있습니다.
클라이언트에서 client.ovpn파일을 편집합니다.
$ cd ~/Downloads/
$ vi client.ovpn
hostname, port를 지정합니다.
remote my-server-1 1194user nobody
group nogroupca, cert, key 는 commented out 시켜 버립니다.
# ca ca.crt
# cert client.crt
# key client.key그 다음으로
<ca>
(insert ca.crt here)
</ca>
<cert>
(insert client1.crt here)
</cert>
<key>
(insert client1.key here)
</key>Simple Server Configuration
sudo cp /usr/share/doc/openvpn/examples/sample-config-files/server.conf.gz /etc/openvpn/
sudo gzip -d /etc/openvpn/server.conf.gz
sudo vi /etc/openvpn/server.conf/etc/openvpn/server.conf안의 내용들이 certificates 그리고 keys값들을 잘 참조하도록 설정합니다.
$ sudo vi /etc/openvpn/server.conf
ca ca.crt
cert servername.crt
key servername.key
dh dh2048.pem/etc/openvpn/server.conf 파일을 열고 다음을 uncomment처리 해줍니다. (끝나면 다음과 같이 보여야 합니다.)
$ sudo vi /etc/openvpn/server.conf
push "redirect-gateway def1 bypass-dhcp"
push "dhcp-option DNS 208.67.222.222"
push "dhcp-option DNS 208.67.220.220"
proto tcp
;proto udp
user nobody
group nogroup/etc/sysctl.conf 파일을 열고, 다음의 내용을 uncomment처리 해줍니다.
net.ipv4.ip_forward=1그리고 다음을 실행시켜 줍니다.
sudo sysctl -p /etc/sysctl.conf테스트하는 방법은 다음과 같이 합니다.
$ sudo openvpn --config server.conf
$ ifconfig tun0
tun0      Link encap:UNSPEC  HWaddr 00-00-00-00-00-00-00-00-00-00-00-00-00-00-00-00
          inet addr:10.8.0.1  P-t-P:10.8.0.2  Mask:255.255.255.255
          UP POINTOPOINT RUNNING NOARP MULTICAST  MTU:1500  Metric:1
          RX packets:0 errors:0 dropped:0 overruns:0 frame:0
          TX packets:0 errors:0 dropped:0 overruns:0 carrier:0
          collisions:0 txqueuelen:100
          RX bytes:0 (0.0 B)  TX bytes:0 (0.0 B)
Client
sudo apt-get install network-manager-openvpn
sudo apt-get install network-manager-openvpn-gnome
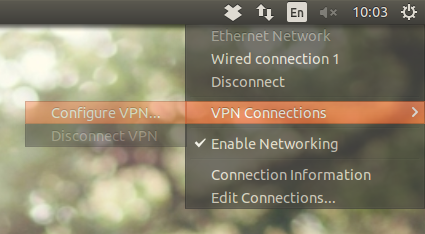
VPN Connections -> Configure VPN… 선택
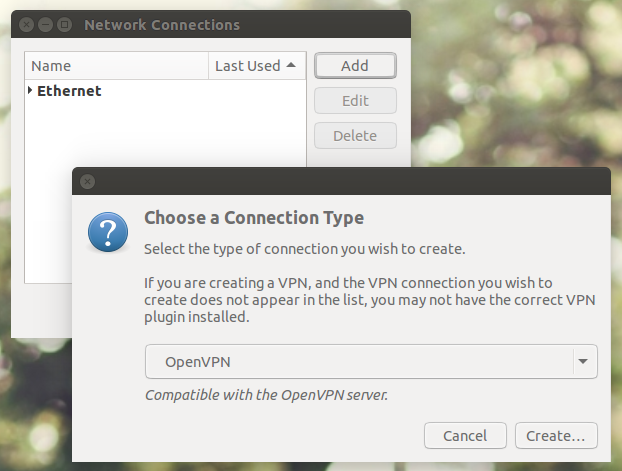
Add -> OpenVPN 선택
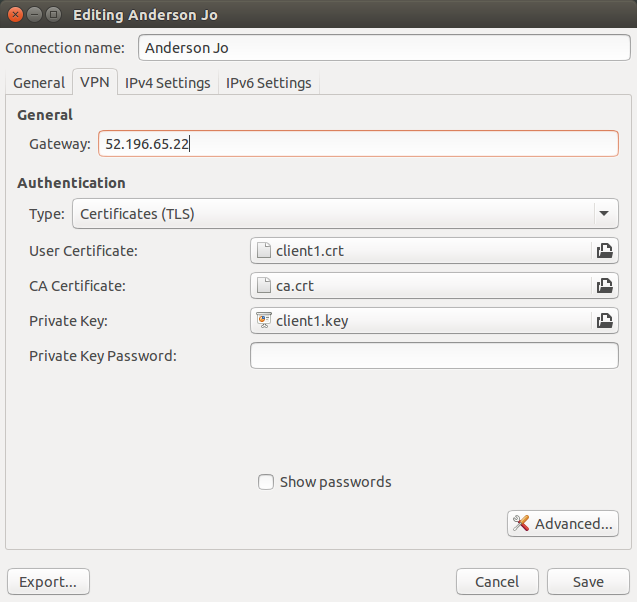
Client Certificate, CA, Private Key를 등록시켜줍니다.
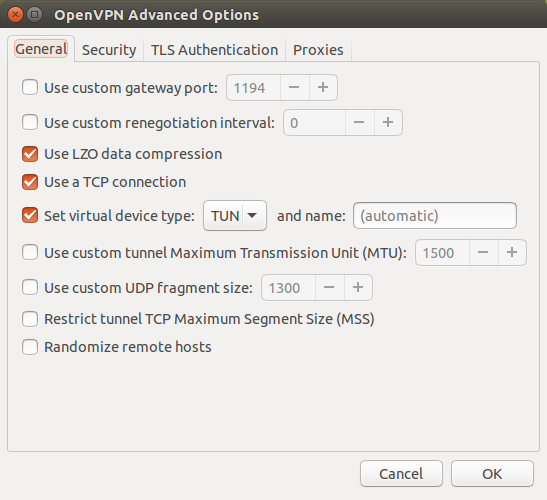
TCP, LZO Compression, TUN등등.. 설정을 해줍니다.
접속후 성공 화면.

Open Internet Access
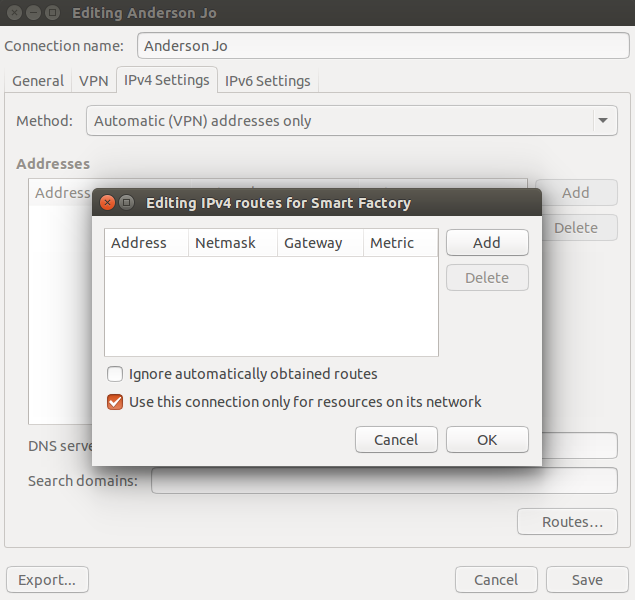
클라이언트에서 인터넷을 접속하되, VPN에 있는 resources에 접속하려면 다음과 같이 설정합니다.
IPv4 Settings -> Routes -> Use this connection only for resources on its network 를 체크해주셔야 합니다.
Routing
예를 들어서 10.10.30.125 으로 접속해야 합니다.
$ ifconfig tun0
tun0      Link encap:UNSPEC  HWaddr 00-00-00-00-00-00-00-00-00-00-00-00-00-00-00-00
          inet addr:10.8.0.6  P-t-P:10.8.0.5  Mask:255.255.255.255
          UP POINTOPOINT RUNNING NOARP MULTICAST  MTU:1500  Metric:1
          RX packets:0 errors:0 dropped:0 overruns:0 frame:0
          TX packets:0 errors:0 dropped:0 overruns:0 carrier:0
          collisions:0 txqueuelen:100
          RX bytes:0 (0.0 B)  TX bytes:0 (0.0 B)

$ route
Kernel IP routing table
Destination     Gateway         Genmask         Flags Metric Ref    Use Iface
default         192.168.1.1     0.0.0.0         UG    100    0        0 enp0s31f6
link-local      *               255.255.0.0     U     1000   0        0 enp0s31f6
192.168.1.0     *               255.255.255.0   U     100    0        0 enp0s31f6
ifconfig tun0 쳤을때 P-t-P:10.8.0.5 라고 나온 부분이 바로 Gateway입니다.
route를 쳤을때 접속하려는 주소 10.10.30.125관련된 route정보가 안나온다면.. VPN설정 -> IPv4 Settings -> Routes 에서 다음과 같이 설정합니다.
