Spark Cluster, Yarn, PySpark
- Configuration - {:.} conf/spark-env.sh - {:.} conf/slaves - {:.} HDP Spark Jar configuration
- Standalone Cluster - {:.} Starting Master - {:.} Starting Slave - {:.} Stoping Master & Slave - {:.} Spark PI on Standalone Cluster - {:.} Spark PI remotely - {:.} Running Spark PI Code - {:.} Spark WEB UI
- Spark Yarn Mode - {:.} Overview - {:.} Spark Pi on YARN host - {:.} SPark Pi remotely - {:.} Spark Network Configuration
- Scala Spark - {:.} Installing SBT on Ubuntu - {:.} IntelliJ Configuration - {:.} build.sbt - {:.} Spark Test
- Errors - {:.} Missing Jersey 1.17 - {:.} Service ‘sparkDriver’ could not bind on port 0
- PySpark Installation - {:.} Download Apache Spark - {:.} Python Path Configuration - {:.} Pycharm Configuration
- PySpark Basic 101 - {:.} Initializing a SparkContext - {:.} Word Count - {:.} Map Reduce - {:.} Cache or Persist - {:.} RDD Operations - {:.} Union & Lineage Graph - {:.} Take VS Collect - {:.} Top - {:.} Set - {:.} Distinct & Sample - {:.} Aggregate
- SQL & Dataframe - {:.} Initialization - {:.} Creating Dataframe
- SQL using JDBC - {:.} PostgreSQL Connection - {:.} Example
- Spark YARN Cluster - {:.} Overview
- YARN (Yet Another Resource Negotiator) - {:.} Limitations of classical MapReduce - {:.} Addressing the scalability issue - {:.} YARN (The next generation of Hadoop’s compute platform) - {:.} Application Submission in YARN

Configuration
conf/spark-env.sh
vi로 직접 입력시, Ambari에서 Spark Roboot시킬때 마다, 초기화가 됩니다.
sudo -u spark vi /usr/hdp/current/spark-client/conf/spark-env.shexport HADOOP_CONF_DIR=/etc/hadoop/2.4.2.0-258/0/
export SPARK_LOCAL_IP=0.0.0.0
export SPARK_PUBLIC_DNS="current_node_public_dns"
export SPARK_WORKER_CORES=6
export SPARK_MASTER_WEBUI_PORT=8081
export LD_LIBRARY_PATH=/usr/hdp/current/hadoop-client/lib/native/:$LD_LIBRARY_PATH| Name | Description |
| SPARK_MASTER_PORT / SPARK_MASTER_WEBUI_PORT | to use non-default ports |
| SPARK_WORKER_CORES | to set the number of cores to use on this machine |
| SPARK_WORKER_MEMORY | to set how much memory to use (for example 1000MB, 2GB) |
| SPARK_WORKER_PORT | SPARK_WORKER_WEBUI_PORT |
| SPARK_WORKER_INSTANCE | to set the number of worker processes per node |
| SPARK_WORKER_DIR | to set the working directory of worker processes |
SPARK_WORKER_CORES의 경우 Spark Worker Machine이 갖는 물리적인 cores의 갯수를 뜻하는 것이 아니라,
Spark Worker가 Spark Executors에게 할당 할 수 있는 Spark tasks의 갯수(즉 threads)를 뜻합니다.
예를 들어서 m4.large 인스턴스의 경우 2CPU cores를 갖고 있습니다. 이경우 하나의 Spark Executor가 해당 Spark Worker(EC2)안에서 생성이 된다고 가정할때, 2개의 CPU안에서 6개의 Spark tasks 가 분산처리 됩니다.
conf/slaves
Spark Worker Nodes들의 Public DNS들을 적습니다.
spark_worker1_public_dns
spark_worker2_public_dns
spark_worker3_public_dns
HDP Spark Jar configuration
sudo su hdfs
HDP_VERSION=2.4.2.0-258
SPARK_JAR=spark-assembly-1.6.1.2.4.2.0-258-hadoop2.7.1.2.4.2.0-258.jar
hdfs dfs -mkdir "/hdp/apps/${HDP_VERSION}/spark/"
hdfs dfs -put "/usr/hdp/${HDP_VERSION}/spark/lib/$SPARK_JAR" "/hdp/apps/${HDP_VERSION}/spark/spark-hdp-assembly.jar"
안해주면.. 아래와 같은 에러가 나올수 있습니다.
No spark assembly jar for HDP on HDFS, defaultSparkAssembly:hdfs://hostname:8020/hdp/apps/2.4.2.0-258/spark/spark-hdp-assembly.jarStandalone Cluster
Starting Master
cd /usr/hdp/current/spark-client
sudo -u spark sbin/start-master.sh -h 0.0.0.0 -p 7077
Starting Slave
sudo -u spark mkdir /var/run/spark/work
cd /usr/hdp/current/spark-client
sudo -u spark sbin/start-slave.sh spark://localhost:7077
이때 Service ‘sparkWorker’ could not bind on port 0. Attempting port 1 에러가 발생한다면.. spark-env.sh에 export SPARK_LOCAL_IP=127.0.0.1를 추가시켜 줍니다.
sudo -u spark vi conf/spark-env.sh
export SPARK_LOCAL_IP=127.0.0.1
Stoping Master & Slave
cd /usr/hdp/current/spark-client
sudo -u spark sbin/stop-master.sh
sudo -u spark sbin/stop-slave.sh
Spark PI on Standalone Cluster
Running on HDP
cd /usr/hdp/current/spark-client
sudo -u spark spark-submit --class org.apache.spark.examples.SparkPi --master spark://hostname:7077 --num-executors 3 --driver-memory 512m --executor-memory 512m --executor-cores 1 lib/spark-examples*.jar 10
Running on Pre-built Spark
./bin/run-example SparkPiSpark PI remotely
cd $SPARK_HOME
export HADOOP_USER_NAME=spark
spark-submit --class org.apache.spark.examples.SparkPi --master spark://sf-master:7077 --num-executors 3 --driver-memory 512m --executor-memory 512m --executor-cores 1 examples/jars/spark-examples*.jar 10
Running Spark PI Code
package spark.pi

import scala.math.random
import org.apache.spark._

/** Computes an approximation to pi */
object SparkPi {
  def main(args: Array[String]) {
    val conf = new SparkConf()
      .setAppName("Spark Pi From Anderson")
      .setMaster("spark://localhost:7077")
      .set("spark.executor.memory", "512m")
      .set("spark.cores.max", "3")

    val spark = new SparkContext(conf)
//    spark.addJar("target/scala-2.11/scalatutorial_2.11-1.0.jar")

    val slices = if (args.length > 0) args(0).toInt else 2
    val n = 100000 * slices
    val count = spark.parallelize(1 to n, slices).map { i =>
      val x = random * 2 - 1
      val y = random * 2 - 1
      if (x * x + y * y < 1) 1 else 0
    }.reduce(_ + _)
    println("Pi is roughly " + 4.0 * count / n)
    spark.stop()
  }
}
IntelliJ
IntelliJ에서 직접 실행시킬수 있는데, java.lang.ClassNotFoundException: spark.pi.SparkPi$$anonfun$1 에러가 발생하면 다음의 코드르 넣어서 jar파일을 추가합니다.
spark.addJar("target/scala-2.11/scalatutorial_2.11-1.0.jar")Packaging via sbt
sbt packageHADOOP_USER_NAME=spark /home/anderson/apps/spark-1.6.1-bin-hadoop2.6/bin/spark-submit --class spark.pi.SparkPi --master spark://hostname:7077 target/scala-2.10/scalatutorial_2.10-1.0.jar 10Spark WEB UI
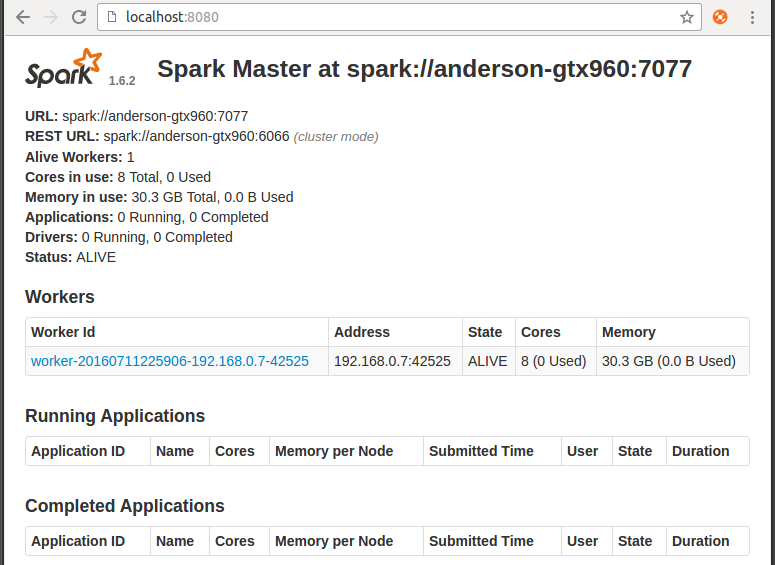
http://localhost:8080/ 에 들어가서 master Web UI를 확인해볼수 있습니다.
기본 Master Listening port는 7077 입니다.
| Argument | Meaning |
|---|---|
| -h HOST, –host HOST | Hostname to listen on |
| -i HOST, –ip HOST | Hostname to listen on (deprecated, use -h or –host) |
| -p PORT, –port PORT | Port for service to listen on (default: 7077 for master, random for worker) |
| –webui-port PORT | Port for web UI (default: 8080 for master, 8081 for worker) |
| -c CORES, –cores CORES | Total CPU cores to allow Spark applications to use on the machine (default: all available); only on worker |
| -m MEM, –memory MEM | Total amount of memory to allow Spark applications to use on the machine, in a format like 1000M or 2G (default: your machine’s total RAM minus 1 GB); only on worker |
| -d DIR, –work-dir DIR | Directory to use for scratch space and job output logs (default: SPARK_HOME/work); only on worker |
| –properties-file FILE | Path to a custom Spark properties file to load (default: conf/spark-defaults.conf) |
Spark Yarn Mode
Overview
Hadoop Namenode는 Spark Master로 사용되고, Hadoop Datanodes는 Spark workers로서 YARN에서 사용될 수 있습니다.
Spark Pi on YARN host
cd  /usr/hdp/current/spark-client
sudo -u spark spark-submit --class org.apache.spark.examples.SparkPi --master yarn --num-executors 3 --driver-memory 512m --executor-memory 512m --executor-cores 1 lib/spark-examples*.jar 10
SPark Pi remotely
먼저 client-side configurations 파일들을 가르키는 HADOOP_CONF_DIR 또는 YARN_CONF_DIR가 필요합니다.
모든 파일이 다 필요한 것은 아니고, core-site.xml 그리고 yarn-site.xml만 있으면 됩니다.
이렇게 하는 이유는 spark-submit을 할때 –master 옵션에 Standalone Cluster 또는 Mesos와는 다르게 주소가 아닌 yarn이 들어가기 때문입니다.
Copying core-site.xml and yarn-site.xml to my computer
mkdir -p ~/apps/hdp_conf
scp -i ~/.ssh/dev.pem ubuntu@yarn-master:/etc/hadoop/2.4.2.0-258/0/yarn-site.xml ~/apps/hdp_conf/
scp -i ~/.ssh/dev.pem ubuntu@yarn-master:/etc/hadoop/2.4.2.0-258/0/core-site.xml ~/apps/hdp_conf/
export HADOOP_CONF_DIR=/home/anderson/apps/hdp_conf/
export HADOOP_USER_NAME=spark
spark-submit --class org.apache.spark.examples.SparkPi --master yarn --num-executors 3 --driver-memory 512m --executor-memory 512m --executor-cores 1 $SPARK_HOME/examples/jars/spark-examples*.jar 10Spark Network Configuration
Standalone mode only
| From | To | Default Port | Purpose | Configuration Setting | Notes |
|---|---|---|---|---|---|
| Browser | Standalone Master | 8080 | Web UI | spark.master.ui.port SPARK_MASTER_WEBUI_PORT | Jetty-based. Standalone mode only. |
| Browser | Standalone Worker | 8081 | Web UI | spark.worker.ui.port SPARK_WORKER_WEBUI_PORT | Jetty-based. Standalone mode only. |
| Driver / Standalone Worker | Standalone Master | 7077 | Submit job to cluster Join cluster | SPARK_MASTER_PORT | Set to “0” to choose a port randomly. Standalone mode only. |
| Standalone Master | Standalone Worker | (random) | Schedule executors | SPARK_WORKER_PORT | Set to “0” to choose a port randomly. Standalone mode only. |
All cluster managers
| From | To | Default Port | Purpose | Configuration Setting | Notes |
| Browser | Application | 4040 | Web UI | spark.ui.port | Jetty-based |
| Browser | History Server | 18080 | Web UI | spark.history.ui.port | Jetty-based |
| Executor / Standalone Master | Driver | (random) | Connect to application Notify executor state changes | spark.driver.port | Set to “0” to choose a port randomly. |
| Executor / Driver | Executor / Driver | (random) | Block Manager port | spark.blockManager.port | Raw socket via ServerSocketChannel |
Scala Spark
Installing SBT on Ubuntu
echo "deb https://dl.bintray.com/sbt/debian /" | sudo tee -a /etc/apt/sources.list.d/sbt.list
sudo apt-key adv --keyserver hkp://keyserver.ubuntu.com:80 --recv 642AC823
sudo apt-get update
sudo apt-get install sbt
IntelliJ Configuration
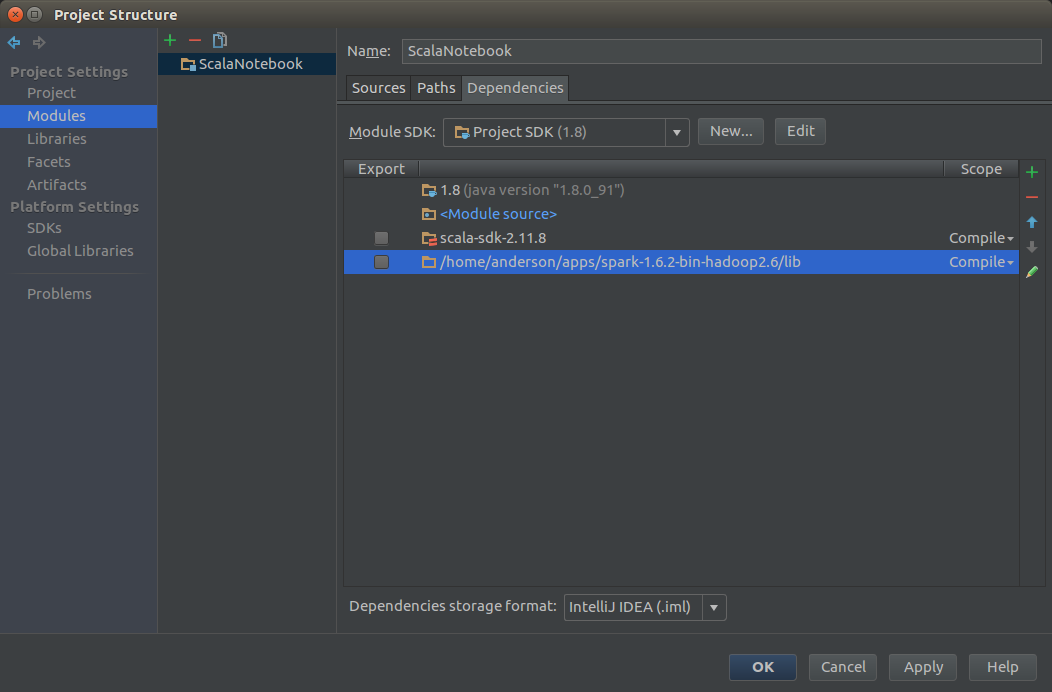
Project생성시에는 Scalar -> SBT 를 선택합니다.
Project Structure -> Modules -> Dependencies -> + 추가 -> $SPARK_HOME/lib 를 추가
build.sbt
중요한 점은, scalaVersion이 정확하게 2.10.5이어야 합니다.
name := "ScalaTutorial"
version := "1.0"
scalaVersion := "2.10.5"
libraryDependencies += "org.apache.spark" % "spark-core_2.11" % "1.6.2"Spark Test
build.sbt
name := "scala-lab"
version := "1.0"
scalaVersion := "2.10.5"

// https://mvnrepository.com/artifact/org.apache.spark/spark-core_2.10
libraryDependencies += "org.apache.spark" % "spark-core_2.11" % "2.0.0"
SimpleApp.scala
import org.apache.spark.{SparkConf, SparkContext}

object SimpleApp {
  def main(args: Array[String]): Unit = {

    val conf = new SparkConf()
    conf.setAppName("Anderson's Simple Application")
    conf.setMaster("local[*]")

    val sc = new SparkContext(conf)
    val data = Array(1, 2, 3, 4, 5, 6, 7, 8, 9, 10)
    val rdd = sc.parallelize(data)
    println(rdd.reduce((a, b) => a + b))
  }
}
Errors
Missing Jersey 1.17
[Jersey 1.17][Jersey 1.17]를 다운받아서 $SPARK_HOME/jars 안에 넣으면 됩니다.
Exception in thread "main" java.lang.NoClassDefFoundError: com/sun/jersey/api/client/config/ClientConfig
	at org.apache.hadoop.yarn.client.api.TimelineClient.createTimelineClient(TimelineClient.java:55)
	at org.apache.hadoop.yarn.client.api.impl.YarnClientImpl.createTimelineClient(YarnClientImpl.java:181)
	at org.apache.hadoop.yarn.client.api.impl.YarnClientImpl.serviceInit(YarnClientImpl.java:168)
	at org.apache.hadoop.service.AbstractService.init(AbstractService.java:163)
	at org.apache.spark.deploy.yarn.Client.submitApplication(Client.scala:150)
	at org.apache.spark.scheduler.cluster.YarnClientSchedulerBackend.start(YarnClientSchedulerBackend.scala:56)
	at org.apache.spark.scheduler.TaskSchedulerImpl.start(TaskSchedulerImpl.scala:149)
	at org.apache.spark.SparkContext.<init>(SparkContext.scala:500)
	at org.apache.spark.SparkContext$.getOrCreate(SparkContext.scala:2256)
	at org.apache.spark.sql.SparkSession$Builder$$anonfun$8.apply(SparkSession.scala:831)
	at org.apache.spark.sql.SparkSession$Builder$$anonfun$8.apply(SparkSession.scala:823)
	at scala.Option.getOrElse(Option.scala:121)
	at org.apache.spark.sql.SparkSession$Builder.getOrCreate(SparkSession.scala:823)
	at org.apache.spark.examples.SparkPi$.main(SparkPi.scala:31)
	at org.apache.spark.examples.SparkPi.main(SparkPi.scala)
	at sun.reflect.NativeMethodAccessorImpl.invoke0(Native Method)
	at sun.reflect.NativeMethodAccessorImpl.invoke(NativeMethodAccessorImpl.java:62)
	at sun.reflect.DelegatingMethodAccessorImpl.invoke(DelegatingMethodAccessorImpl.java:43)
	at java.lang.reflect.Method.invoke(Method.java:498)
	at org.apache.spark.deploy.SparkSubmit$.org$apache$spark$deploy$SparkSubmit$$runMain(SparkSubmit.scala:729)
	at org.apache.spark.deploy.SparkSubmit$.doRunMain$1(SparkSubmit.scala:185)
	at org.apache.spark.deploy.SparkSubmit$.submit(SparkSubmit.scala:210)
	at org.apache.spark.deploy.SparkSubmit$.main(SparkSubmit.scala:124)
	at org.apache.spark.deploy.SparkSubmit.main(SparkSubmit.scala)
Caused by: java.lang.ClassNotFoundException: com.sun.jersey.api.client.config.ClientConfig
	at java.net.URLClassLoader.findClass(URLClassLoader.java:381)
	at java.lang.ClassLoader.loadClass(ClassLoader.java:424)
	at sun.misc.Launcher$AppClassLoader.loadClass(Launcher.java:331)
	at java.lang.ClassLoader.loadClass(ClassLoader.java:357)
	... 24 more
Service ‘sparkDriver’ could not bind on port 0
spark-submit을 할때 발생을 합니다.
sudo -u spark vi conf/spark-env.sh다음을 추가 시킵니다.
SPARK_LOCAL_IP=127.0.0.1PySpark Installation
Download Apache Spark
다운로드 페이지에서 Spark를 다운 받습니다.
Python Path Configuration
적절한곳에 압축을 풀어주고, 설치를 합니다.
(아래의 SPARK_HOME은 스파크가 설치할 곳으로 수정해주셔야 합니다.)
export SPARK_HOME=/home/anderson/apps/spark-1.6.2-bin-hadoop2.6
export PYTHONPATH=$PYTHONPATH:$SPARK_HOME/python
export PYTHONPATH=$PYTHONPATH:$SPARK_HOME/python/lib/py4j-0.9-src.zip

export CLASSPATH=$CLASSPATH:/path/postgresql-9.3-1103.jdbc3.jar
export SPARK_CLASSPATH=/path/postgresql-9.3-1103.jdbc3.jar
설치가 잘 되었다면, import pyspark가 에러없이 import가 됩니다.
import pysparkPycharm Configuration
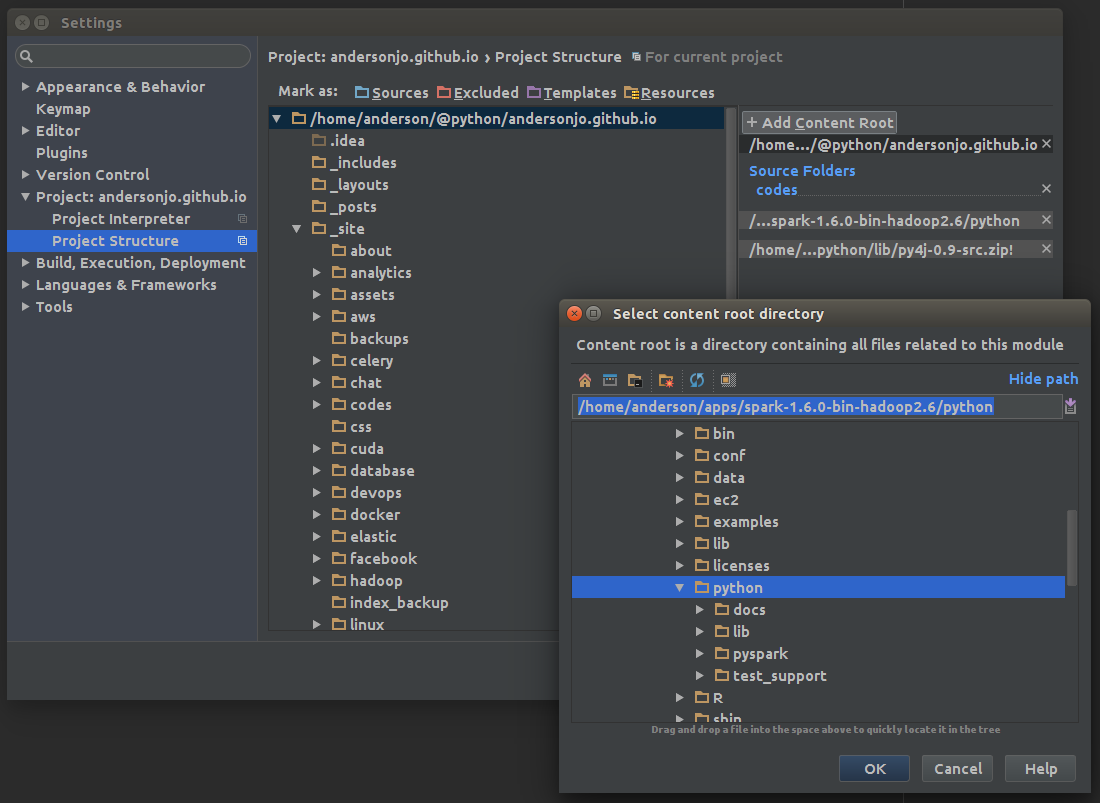
Project Structure에서 PySpark가 있는 위치를 Add Content Root를 눌러서 추가시켜줍니다.
PySpark Basic 101
Initializing a SparkContext
from pyspark import SparkContext, SparkConf

spconf = SparkConf().setMaster('local').setAppName('Tutorial')
sc = SparkContext(conf=spconf)
실행시키는 방법은 Spark home안의 bin 디렉토리안에있는 spark-submit을 이용합니다.
spark-submit tutorial.pyWord Count
Hadoop Map-Reduce에서도 Word Count부터 했는데, 마찬가지로 Spark에서도 Word Count부터 시작을 해보겠습니다.
textFile = sc.textFile('README.md')
print textFile.count()  # 36 ;the number of lines
print textFile.first()  # Examples for Learning Spark

pythonLines = textFile.filter(lambda line: 'python' in line.lower())
print pythonLines.first()
Map Reduce
가장 많은 단어가 들어있는 line의 단어 갯수를 알아냅니다.
textFile = sc.textFile('README.md')
def max(a, b):
    return a if a > b else b

textFile.map(lambda line: len(line.split(' '))).reduce(max) # 36
단어별 나온 횟수를 알아냅니다.
flatMap은 받은 element를 리스트같은 형태로 lambda에서 리턴시키면 flatten시켜버립니다.
즉 flatMap 다음에 다시 map함수가 나오는데.. 여기서 flatted 된 각각 elements를 map을 돌 수 있습니다.
reduceByKey는 Merge의 개념이라고 보면 됩니다.
wordCounts = textFile.flatMap(lambda line: line.split()).\
    map(lambda word: (word, 1)).reduceByKey(combine)
print sorted(wordCounts.collect(), key=lambda d: d[1], reverse=True)
# [(u'the', 10), (u'*', 6), (u'Spark', 5), (u'for', 4), (u'of', 4), ...]
Cache or Persist
기본적으로 Spark는 action을 실행시키면 (즉 lazy하게 실행이 저장했다가 실제로 분석을 시작하는 때) 실행시킬때 마다 recompute하게 됩니다. 만약에 나온 결과물을 재사용하고 싶다면, cache() 또는 persist()함수를 사용할 수 있습니다.
cache() 또는 persist()를 사용하게 되면 여러대의 분산된 컴퓨터에 동일한 데이터가 메모리상에 존재하게 되고,
재사용시 메모리에 저장된 결과물을 재사용하게 됩니다.
- cache는 메모리에, persist는 어디 위치에 저장할지 정할 수 있습니다.
rdd.cache()from pyspark import StorageLevel
...
rdd.persist(StorageLevel.MEMORY_ONLY_SER_2)| Storage Level | Meaning |
|---|---|
| MEMORY_ONLY | Store RDD as deserialized Java objects in the JVM. If the RDD does not fit in memory, some partitions will not be cached and will be recomputed on the fly each time they’re needed. This is the default level. |
| MEMORY_AND_DISK | Store RDD as deserialized Java objects in the JVM. If the RDD does not fit in memory, store the partitions that don’t fit on disk, and read them from there when they’re needed. |
| MEMORY_ONLY_SER | Store RDD as serialized Java objects (one byte array per partition). This is generally more space-efficient than deserialized objects, especially when using a fast serializer, but more CPU-intensive to read. |
| MEMORY_AND_DISK_SER | Similar to MEMORY_ONLY_SER, but spill partitions that don’t fit in memory to disk instead of recomputing them on the fly each time they’re needed. |
| DISK_ONLY | Store the RDD partitions only on disk. |
| MEMORY_ONLY_2, MEMORY_AND_DISK_2, etc | Same as the levels above, but replicate each partition on two cluster nodes. |
RDD Operations
RDD에는 2가지 type의 operations이 있습니다. transformation과 action.
transformation은 새로운 RDD를 리턴시킵니다. (즉 map, reduce 같은것..)
action은 우리가 만들어 놓은 RDD를 실제로 kick off시켜서 결과를 내놓습니다. (count, first 같은 함수들..)
Union & Lineage Graph
만약 Transformation으로 새로운 RDD를 얻게 되면, Spark는 해당 RDD의 계보(Lineage)를 keep track of하게 됩니다.
만약 transformation으로 손실된 데이터가 있다면, Lineage에 따라서 Union을 통해 서로 다시 합칠수도 있습니다.
data = sc.parallelize(['a', 'b', 'c', 'd', 'e', 1,2,3,4,5])
data.cache()

alpha = data.filter(lambda word: type(word) == str or type(word) == unicode)
alpha.cache()

numeric = data.filter(lambda word: type(word) == int)
numeric.cache()

print alpha.collect() #  ['a', 'b', 'c', 'd', 'e']
print numeric.collect() # [1, 2, 3, 4, 5]

print alpha.union(numeric).collect() # ['a', 'b', 'c', 'd', 'e', 1, 2, 3, 4, 5]
Take VS Collect
Take는 전체 데이터셋에서 일부를 가져오고, Collect는 전체 데이터를 driver (현재 돌리고 있는 컴퓨터)로 가져옵니다.
collect함수는 전체 데이터를 가져오기 때문에 Map-Reduce로 작은 싸이즈로 줄어들었거나, 또는 driver의 메모리안으로 가져올 만큼의 양으로
줄어들었을때 가능합니다.
이렇게 큰 경우 saveAsTextFile() 또는 saveAsSequenceFile()을 사용해서 저장하거나, S3, HDFS에 저장할 수 있습니다.
rdd = sc.parallelize([1,2,3,4,5,6,7,8,9,10,11,12,13,14,15])
for line in rdd.take(5):
    print line # 1 2 3 4 5
Top
순서상이 아니라, 값이 가장 큰것 순서대로 리턴을 시킵니다.
rdd = sc.parallelize(['a', 'b', 'c', 'd', 'e', 'z', 'y', 'x', 'f', 'g'])
rdd.top(3) # ['z', 'y', 'x']
Set
union, intersection, subtract등의 집합 연산도 가능합니다.
rdd1 = sc.parallelize([1,2,3,4,5, 'a'])
rdd2 = sc.parallelize(['a', 'b', 'c', 1, 2])

rdd1.union(rdd2).collect() # [1, 2, 3, 4, 5, 'a', 'a', 'b', 'c', 1, 2]
rdd1.intersection(rdd2).collect() # ['a', 2, 1]
rdd1.subtract(rdd2).collect() # [4, 3, 5]
Cartesian Product는 A, B RDD에 있는 모든 elements들을 pair로 묶습니다.
유사성을 검사할때 좋지만, 매우 expensive 하니 크기가 큰 RDD에는 적합하지 않습니다.
rdd1 = sc.parallelize([1,2])
rdd2 = sc.parallelize(['a', 'b', 'c'])

rdd1.cartesian(rdd2).collect()
# [(1, 'a'), (1, 'b'), (1, 'c'), (2, 'a'), (2, 'b'), (2, 'c')]
Distinct & Sample
Distinct는 중복되는 elements를 제거합니다.
rdd = sc.parallelize([1,1,2,2,2,3,4])
rdd.distinct().collect() # [1, 2, 3, 4]
rdd.sample(self, withReplacement, fraction, seed=None)
withReplacement가 True이면 중복해서 여러번 같은 element를 선택할 수 있게 됩니다.
fraction sample의 싸이즈를 정합니다. 0~1사이의 소수값이 들어가고,
값이 크면 클수록 sample의 싸이즈또한 커지게 됩니다.
rdd = sc.parallelize([10,20,30,40,50,60,70,80,90,100])
rdd.sample(False, 0.5).collect()
# [40, 50, 60]
# [30, 40, 50, 90, 100]
# [50, 80, 90, 100]

rdd.sample(True, 0.5).collect()
# [10, 10, 20, 30, 60, 60, 80, 90, 100, 100]
# [10, 100, 100]

rdd.sample(True, 0).collect()
# []
Aggregate
aggregate는 reduce와 유사하지만, Return Value가 다른 타입입니다.
rdd.aggregate(self, zeroValue, seqOp, combOp) zeroValue 는 초기값
아래는 평균값을 구하는 코드입니다.
첫번째 lambda acc, v에서 리턴시 전혀 다른 type으로 리턴가능하며, acc는 변경가능하지만, v값은 변경하면 안됩니다.
두번째 lambda acc1, acc2에서는 첫번째 lambda에서 돌은 값을 merge시켜주는 역활을 합니다.
rdd = sc.parallelize([1,2,3,4,5,6,7,8,9,10])
sum, avg = rdd.aggregate((0, 0),
              lambda acc, v: (acc[0] + v, acc[1] + 1),
              lambda acc1, acc2: (acc1[0] + acc2[0], acc1[1] + acc2[1]))
# sum: 55, avg: 10
print sum/float(avg) # 5.5
SQL & Dataframe
Initialization
.bashrc에 SPARK_CLASSPATH에다가 JDBC jar파일을 추가해줍니다.
export CLASSPATH=$CLASSPATH:/path/postgresql-9.3-1103.jdbc3.jar
export SPARK_CLASSPATH=/path/postgresql-9.3-1103.jdbc3.jar
from pyspark import SparkContext, SparkConf
from pyspark.sql import SQLContext
spconf = SparkConf().setMaster('local').setAppName('Tutorial')
sc = SparkContext(conf=spconf)
sqlContext = SQLContext(sc)SQLContext 이외에도 HiveContext 를 이용할수도 있습니다.
Creating Dataframe
df = sqlContext.read.json("examples/src/main/resources/people.json")
df.show()
# +----+-------+
# | age|   name|
# +----+-------+
# |null|Michael|
# |  30|   Andy|
# |  19| Justin|
# +----+-------+df.printSchema()
# root
# |-- age: long (nullable = true)
# |-- name: string (nullable = true)df.select("name").show()
# +-------+
# | name|
# +-------+
# |Michael|
# | Andy|
# | Justin|
# +-------+df.select(df['name'], df['age'] + 1).show()
# +-------+---------+
# | name|(age + 1)|
# +-------+---------+
# |Michael| null|
# | Andy| 31|
# | Justin| 20|
# +-------+---------+df.filter(df['age'] > 21).show()
# +---+----+
# |age|name|
# +---+----+
# | 30|Andy|
# +---+----+df.groupBy("age").count().show()
# +----+-----+
# | age|count|
# +----+-----+
# |null| 1|
# | 19| 1|
# | 30| 1|
# +----+-----+SQL using JDBC
PostgreSQL Connection
import os
os.environ['SPARK_CLASSPATH'] = "/path/to/postgresql-9.3-1103.jdbc3.jar"

df = sqlContext.read.format("jdbc").options(
    url="jdbc:postgresql://host:port/database",
    port=5432,
    driver = "org.postgresql.Driver",
    dbtable = "users",
    user="user_name",
    password="password").load()
Example
sqlContext.registerDataFrameAsTable(df, 'users')
df2 = sqlContext.sql('select id, nickname from users where id=155 limit 1')
print df2.collect()
# [Row(id=155, nickname=u'\uc575\uadf8\ub9ac\uc564\ub354\uc2a8')]
Spark YARN Cluster
Overview
YARN에서는 각각의 application instance는 ApplicationMaster를 갖고 있습니다. AM은 ResourceManager로부터 resource를 요청하며, 자원이 할당되면, NodeManager에게 containers를 할당된 자원으로 실행시킬것을 요청합니다.
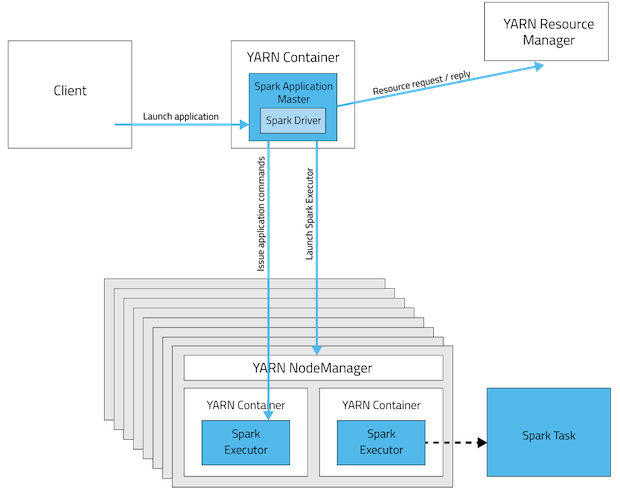
Spark Cluster mode에서는, Spark drive는 ApplictionMaster안에서 실행이 됩니다. 해당 AM은 application실행과, 자원요청을 담당하게 됩니다.
| Mode | YARN Client Mode | YARN Cluster Mode |
|---|---|---|
| Driver | Client | ApplicationMaster |
| Requests resources | ApplicationMaster | ApplicationMaster |
| Starts executor processes | YARN NodeManager | YARN NodeManager |
| Persistent services | YARN ResourceManager and NodeManagers | YARN ResourceManager and NodeManagers |
| Supports Spark Shell | Yes | No |
YARN (Yet Another Resource Negotiator)
Limitations of classical MapReduce
기존 MapReduce 방식은 scalability, resource utilization, 다른 형태의 데이터 프로세싱(MapReduce이외의) 같은 문제점들이 있었습니다.
- JobTracker (a single master process) 가 모든 jobs들을 관리(coordinate)합니다.
- TaskTrackers (a number of subordinate processes)는 주어진 task를 실행시키며, 주기적으로 JobTracker에 프로그래스를 보고합니다.
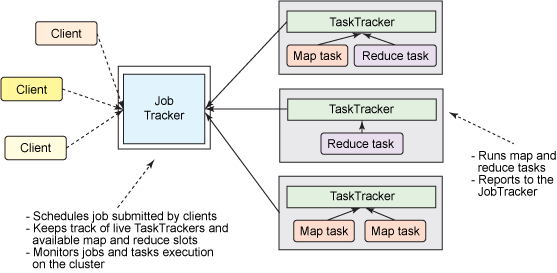
즉 대규모 cluster에서 나타날수 있는 문제점은 단 하나의 Job Tracker가 모든 jobs들을 관리하기 때문에 bottleneck이 생길수 있습니다. 야후에 따르면 5000개의 nodes 그리고 40,000개의 tasks들을 동시(concurrently)처리가 한계점이라고 합니다. 또한 작거나 너무 큰 하둡 클러스터는 computational resources를 효율적으로 사용하지 못했습니다. 또한 MapReduce jobs이외에는 다른 데이터 프로세싱을 돌릴수가 없었습니다. 이에 2010년 야후 엔지니어들을 하둡의 새로운 아키텍쳐를 만들기 시작했습니다.
Addressing the scalability issue
![]()
위와같이 JobTracker혼자서 computational resources과리및, 모든 태스크들의 coordination을 하기 때문에 제약이 생길수 밖에 없는 구조입니다.
해당 이슈를 해결하는 방법은 간단합니다. 혼자서 모든 일을 처리하는 JobTracker의 일을 TaskTrackers들에게 나누고, JobTracker는 cluster resource management (aka Global ResourceManager) 그리고 task coordination(aka ApplicationManster - AM) 으로 2개로 역활을 나누는 것입니다.
YARN (The next generation of Hadoop’s compute platform)
먼저 이전 개념과 YARN에서의 용어를 붙여놓자면.. 다음과 같습니다.
| MR1 | YARN |
|---|---|
| A cluster manager | ResourceManager |
| dedicated and short-lived JobTracker | ApplicationMaster |
| TaskTracker | NodeManager |
| MapReduce Job | A distributed application |
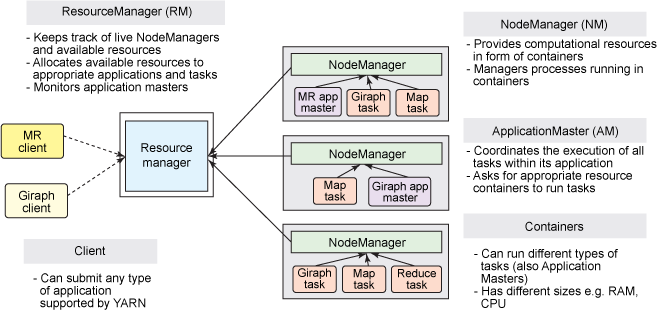
ResourceManager
- a global ResourceManager는 하나의 master deamon으로 돌아가게 되며, 보통 a dedicated machine위에 돌아가게 됩니다.
- live nodes 그리고 resource가 얼마나 가용가능한지 추적합니다.
- 유저가 보낸 application을 언제 얼마나 리소스를 사용할지 coordinate합니다.
- a single processor입니다.
ApplicationMaster
- 유저가 application을 submit하면, 굉장히 가벼운 프로세스인 “ApplicationMaster가 시작됩니다.
- application을 실행시키는데 필요한 일들을 처리합니다. -> 모니터링, 실패한 task에 대해서 재시작 등등
- 컨테이너 안에서 여러가지 태스크들을 돌릴수 있습니다. 예를 들어서 MapReduce ApplicationMaster는 a container에게 a map 또는 a reduce task를 실행하라고 요청할수 있습니다. 반면에 Giraph ApplicationMaster는 a container에게 Giraph task를 돌리라고 요청할수 있습니다. 또한 Custom ApplicationMaster를 만들수도 있습니다. (Apache Twil을 통해서 쉽게 만들수 있음)
NodeManager
- TaskTracker의 더 효율적인 버젼이라고 생각하면 됩니다.
- 고정된 map, reduce slots을 갖고 있는 대신에, dynamically created resource containers들을 갖고 있습니다.
- 컨테이너 안에는 여러 자원을 갖고 있을수 있습니다. 예를 들어 CPU, disk, network IO등등. 하지만 현재는 memory 그리고 CPU (YARN-3)만 지원이 되고 있습니다.
Application Submission in YARN
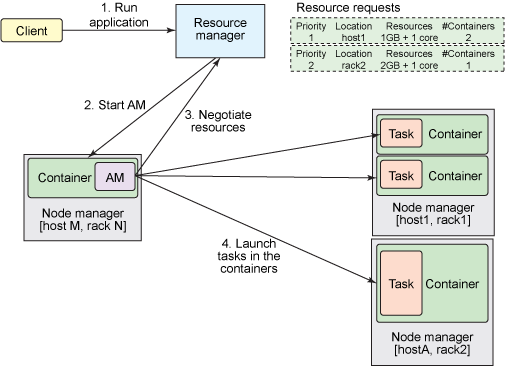
사용자가 application을 ResourceManager로 hadoop jar 명령어 쳐서 (MRv1 처럼)보내면 다음과 같은 일이 발생하게 됩니다.
1. Run Application
- ResourceManger는 클러스터 안에서 실행되고 있는 applications의 리스트와,
각각의 NodeManager에서 사용가능한 resource 리스트를 갖고 있습니다. - ResourceManager는 그 다음 어떤 application이 얼마만큼의 resource를 할당 받아야 할지 결정해야 합니다.
자원사용량은 Queue capacity, ACLs, fairness등등 많은 constraints에 의해서 결정이 됩니다. - ResourceManager는 pluggable Scheduler를 사용하며, 스케쥴러는 containers의 형태로 cluster resource를 누가, 언제 받을지를 결정합니다.
- ResourceManager가 새로운 application을 받으면, 스케쥴러는 어느 컨테이너에 ApplicationMaster를 실행시킬지를 선택합니다.
2. Start AM
3. Negotiate Resources
- ApplicationMaster가 실행되고 난뒤, 해당 application의 전체 life cycle을 책임지게 됩니다.
- 제일먼저 AM은 application의 tasks를 처리하기 위한 containers를 받기 위해서 resource request를 ResourceManager에게 보내게 됩니다.
- a resource request는 applications’의 tasks를 처리하기 위해서 resource requirements를 만족시키는 “컨테이너의 갯수”를 요청하는 것입니다.
- resource requirements는 필요한 메모리(megabytes), CPU, 위치 (hostname, rackname 또는 *등으로 표현), priority 등을 갖고 있습니다.
- ResourceManager는 가능한시점에 resource request를 만족하는 container(container ID 그리고 hostname으로 표현)를 할당합니다.
- 컨테이너는 application이 할당된 자원을 특정 host에서 사용하도록 허용합니다.
4. Launch tasks in the containers
- Container가 할당된뒤, ApplicationMaster는 NodeManager(해당 host를 관리하는 놈)에게 해당 리소스를 사용하여 tasks를 실행하도록 요청합니다. (MapReduce, Giraph task 등등)
- NodeManager는 tasks들을 모니터링하지 않습니다. NodeManager는 오직 컨테이너 안에서 자원사용량만 모니터링합니다. 또한 할당된 자원보다 더 많이 사용하면 container자체를 kill해버립니다.
Complete!
- ApplicationMaster 계속해서 application을 완료하기 위해 계속해서 tasks를 실행시킬 containers를 negotiate합니다. AM은 또한 application 그리고 tasks들의 progress를 모니터링 하며, 실패한 tasks들은 새로 requested된 containers안에서 재시작시키며, 클라이언트에게 application의 진행상황을 알려줍니다.
- application이 완료된 이후, ApplicationMaster는 자기자신을 종료시키고, AM이 있었던 container또한 반환을 하게 됩니다.
- ResourceManager는 application안의 어떠한 tasks에 대해서도 모니터링을 하지 않지만, ApplicationMasters들의 health는 체크합니다. ApplicationManster가 실패하게되면, ResourceManager에 의해서 새로운 container에서 재시작 될 수 있습니다.
- 즉.. ResourceManager는 ApplicationMasters를 관리하고, ApplicationMasters는 tasks들을 관리한다고 보면 됩니다.