AWS Load Balancer on EKS
1. Introduction
일단 두가지 방식의 Load Balancer가 존재합니다.
- Network Load Balancer
- Application Load Balancer
두가지 방식에 대해서 설명하도록 하겠습니다.
2. Network Load Balancer
2.1 What is Network Load Balancer
- L4 에서 로드 밸런싱
- 네트워크 트래픽을 분산시킴
2.2 Deploying Nginx
cat <<EOF > nginx-deployment.yaml
apiVersion: apps/v1
kind: Deployment
metadata:
  name: nginx-deployment
  labels:
    app: nginx
spec:
  replicas: 2
  selector:
    matchLabels:
      app: nginx
  template:
    metadata:
      labels:
        app: nginx
    spec:
      containers:
      - name: nginx
        image: nginx:1.14.2  # ECS Container 로 수정
        imagePullPolicy: Always
        ports:
        - name: http
          containerPort: 80
EOF
$ kubectl apply -f nginx-deployment.yaml
$ kubectl get pods2.3 Network Load Balancer
cat <<EOF > network-service.yaml
apiVersion: v1
kind: Service
metadata:
  name: nginx-service-lb
  annotations:
    service.beta.kubernetes.io/aws-load-balancer-type: external
    service.beta.kubernetes.io/aws-load-balancer-nlb-target-type: ip
    service.beta.kubernetes.io/aws-load-balancer-scheme: internet-facing
spec:
  type: LoadBalancer
  selector:
    app: nginx
  ports:
    - protocol: TCP
      port: 80
      targetPort: 80
EOF
$ kubectl apply -f network-service.yaml
$ kubectl get servicesAWS에서는 두가지 모드로 AWS Load Balancer를 Kubernetes 위에서 올릴수 있습니다.
- Ingress를 통해서 Application Load Balancers 로 프로비저닝 하는 경우
- Service를 통해서 Network Load Balancers 로 프로비저닝 하는 경우
3. Application Load Balancer
3.1 What is Application Load Balancer
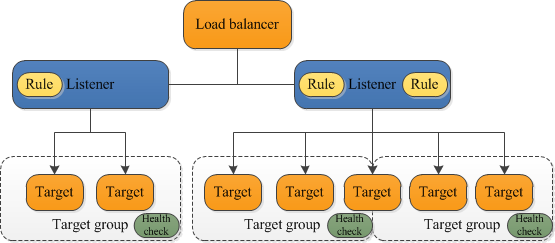
아래 그림처럼 Application LB의 경우 Rule이 listener 를 정의하게 되며,
클라이언트로부터 온 request를 미리 지정해둔 target으로 라우팅 하게 됩니다.
따라서 반드시 default rule은 지정을 해주어야 합니다.
Multiple target groups 을 지정할수 있으며, 각 target group마다 health check을 설정 할 수 있습니다.
EKS 에서 배포되는 ALB의 특징은 다음과 같습니다.
- Kubernetes Ingress 생성할때 AWS Application Load Balancer 도 함께 프로비져닝 됩니다.
- ALB는 L7 에서 로드 밸런싱되며, L4로 하려면 위에 있는 Network Load Balancer 를 하면 됩니다.
3.2 AWS Load Balancer Contoller
- AWS LB Contoller를 통해서 Kubernetes를 위한 AWS Elastic Load Balancers 를 관리하게 됩니다.
- Ingress 는 Application Load Balancers 를 프로비져닝
- Service 는 Network Load Balancers 를 프로비져닝
- AWS Load Balancer Controller 는 오픈소스.
- 설치 방법은 링크를 참조 합니다.
3.2.1 OIDC 생성
먼저 EKS Cluster를 위한 OpenID Connect (OIDC) 가 있는지 확인해 봅니다.
$ aws eks describe-cluster --name <cluster_name> --query "cluster.identity.oidc.issuer" --output text
https://oidc.eks.ap-northeast-2.amazonaws.com/id/D12E32BC25678012345689123456894E

# 있는지 확인
$ aws iam list-open-id-connect-providers | grep D12E32BC25678012345689123456894E
"Arn": "arn:aws:iam::130384630012:oidc-provider/oidc.eks.ap-northeast-2.amazonaws.com/id/D12E32BC25678012345689123456894E"

# 만약 없다면 새로 생성합니다.
$ eksctl utils associate-iam-oidc-provider --cluster <cluster_name> --approve
3.2.2 IAM Policy & Role 설정
아래의 IAM Policy를 다운로드 받습니다.
해당 policy를 통해서 AWS API 콜을 할수 있게 됩니다.
$ curl -o iam_policy.json https://raw.githubusercontent.com/kubernetes-sigs/aws-load-balancer-controller/v2.3.1/docs/install/iam_policy.json

# IAM Policy
$ aws iam create-policy \
    --policy-name AWSLoadBalancerControllerIAMPolicy \
    --policy-document file://iam_policy.json

# 잘 생성됐는지 확인합니다.
$ aws iam list-policies | jq '.Policies[] | select(.PolicyName == "AWSLoadBalancerControllerIAMPolicy")'
{
  "PolicyName": "AWSLoadBalancerControllerIAMPolicy",
  "PolicyId": "ABCDEFG123456789ABCD",
  "Arn": "arn:aws:iam::123456789012:policy/AWSLoadBalancerControllerIAMPolicy",
  "Path": "/",
  "DefaultVersionId": "v1",
  "AttachmentCount": 1,
  "PermissionsBoundaryUsageCount": 0,
  "IsAttachable": true,
  "CreateDate": "2021-01-16T11:39:19+00:00",
  "UpdateDate": "2021-01-16T11:39:19+00:00"
}
IAM Role 을 생성하고, kube-system 아래에 service account도 생성해줍니다.
attach-policy-arn 의 경우 위에서 만든 ARN주소를 넣습니다.
$ eksctl create iamserviceaccount \
  --cluster=my_cluster \
  --namespace=kube-system \
  --name=aws-load-balancer-controller \
  --attach-policy-arn=arn:aws:iam::123456789012:policy/AWSLoadBalancerControllerIAMPolicy \
  --override-existing-serviceaccounts \
  --approve
추가적으로 alb-ingress-controller 삭제해주는 부분이 있는데..
이건 문서 에 링크만 남기겠습니다.
3.2.3 AWS Load Balancer Contoller 설치
eks-charts repository 를 추가합니다.
$ helm repo add eks https://aws.github.io/eks-charts
$ helm repo update
설치합니다.
$ helm install aws-load-balancer-controller eks/aws-load-balancer-controller \
  -n kube-system \
  --set awsRegion=<Region_Name> \
  --set awsVpcID=<Cluster_VPC_ID> \
  --set clusterName=<cluster-name> \
  --set serviceAccount.create=false \
  --set serviceAccount.name=aws-load-balancer-controller

# 확인합니다.
$ kubectl get deployment -n kube-system aws-load-balancer-controller
$ kubectl get serviceaccounts aws-load-balancer-controller -n kube-system
3.2.4 2048 Game
cat <<EOF > game-2048.yaml
---
apiVersion: v1
kind: Namespace
metadata:
  name: game-2048
---
apiVersion: apps/v1
kind: Deployment
metadata:
  namespace: game-2048
  name: deployment-2048
spec:
  selector:
    matchLabels:
      app.kubernetes.io/name: app-2048
  replicas: 5
  template:
    metadata:
      labels:
        app.kubernetes.io/name: app-2048
    spec:
      containers:
      - image: alexwhen/docker-2048
        imagePullPolicy: Always
        name: app-2048
        ports:
        - containerPort: 80
---
apiVersion: v1
kind: Service
metadata:
  namespace: game-2048
  name: service-2048
spec:
  ports:
    - port: 80
      targetPort: 80
      protocol: TCP
  type: NodePort
  selector:
    app.kubernetes.io/name: app-2048
---
apiVersion: networking.k8s.io/v1
kind: Ingress
metadata:
  namespace: game-2048
  name: ingress-2048
  annotations:
    kubernetes.io/ingress.class: alb
    # alb.ingress.kubernetes.io/group.name: game-2048
    # alb.ingress.kubernetes.io/healthcheck-path: "/health-check"
    alb.ingress.kubernetes.io/scheme: internet-facing
    alb.ingress.kubernetes.io/target-type: ip
    alb.ingress.kubernetes.io/listen-ports: '[{"HTTP": 80}, {"HTTP":8080}]'
    # alb.ingress.kubernetes.io/listen-ports: '[{"HTTP": 80}, {"HTTPS":443}]'
    # alb.ingress.kubernetes.io/actions.ssl-redirect: '{"Type": "redirect", "RedirectConfig": { "Protocol": "HTTPS", "Port": "443", "StatusCode": "HTTP_301"}}'
spec:
  defaultBackend:
    service:
      name: zeppelin-server
      port:
        number: 80
  rules:
    - http:
        paths:
          - path: /*
            pathType: ImplementationSpecific
            backend:
              service:
                name: service-2048
                port:
                  number: 80
EOF
위의 내용을 배포합니다.
(위의 내용이 해당 파일 내용과 동일합니다.)
$ kubectl apply -f game-2048.yaml
$ kubectl get ingress -n game-2048
나온 주소로 들어가면 다음과 같은 화면이 나옵니다.