Kubeflow on EKS
개인적으로 kubeflow는 개인적으로 버렸습니다. 이유는 서포트가 적으며 코드 불안정성 그리고 쓰잘때 없는 기능들 때문입니다.
1. Installation
먼저 kubectl, AWS CLI, eksctl 등이 설치되어 있어야 하며, Cluster 생성까지 되어 있어야 합니다.
설치 방법은 링크를 참고 합니다.
1.1 Install kfctl
kfctl download 페이지에 들어가서 최신 버젼을 찾아서 다운받습니다.
현 시점에서는 v1.1.0 이 최신버젼이며 다음과 같이 다운로드 받고 설치 합니다.
$ wget https://github.com/kubeflow/kfctl/releases/download/v1.2.0/kfctl_v1.2.0-0-gbc038f9_linux.tar.gz
$ tar -xvf kfctl_v1.2.0-0-gbc038f9_linux.tar.gz
$ cp ./kfctl /usr/local/bin/
1.2 Prepare Environment
aws configure 를 해서 region이 설치하려는 region과 일치해야 합니다!
kubeflow를 kubernetes에 deploy하기 위한 방법으로 2가지가 제공이 되고 있습니다.
- Authentication없는 버젼:
https://raw.githubusercontent.com/kubeflow/manifests/v1.1-branch/kfdef/kfctl_aws.v1.1.0.yaml
auth에서 아래와 같은 코드를 갖고 있습니다auth: basicAuth: password: 12341234 username: admin@kubeflow.org - Cognito로 인증하는 버젼:
https://raw.githubusercontent.com/kubeflow/manifests/v1.1-branch/kfdef/kfctl_aws_cognito.v1.1.0.yamlauth: cognito: certArn: arn:aws:acm:us-west-2:xxxxx:certificate/xxxxxxxxxxxxx-xxxx cognitoAppClientId: xxxxxbxxxxxx cognitoUserPoolArn: arn:aws:cognito-idp:us-west-2:xxxxx:userpool/us-west-2_xxxxxx cognitoUserPoolDomain: your-user-pool
kfctl configuration file 설정이 이렇다는 것을 이해하고, 다음을 설치하면 됩니다.
# Authentication 없는 설치 방법
export CONFIG_URI="https://raw.githubusercontent.com/kubeflow/manifests/v1.2-branch/kfdef/kfctl_aws.v1.2.0.yaml"

# Cognito로 Authentication하는 방법
export CONFIG_URI="https://raw.githubusercontent.com/kubeflow/manifests/v1.2-branch/kfdef/kfctl_aws_cognito.v1.2.0.yaml"

# Cluster 이름 지정 및 디렉토리 생성
export AWS_CLUSTER_NAME=<YOUR EKS CLUSTER NAME>
mkdir ${AWS_CLUSTER_NAME} && cd ${AWS_CLUSTER_NAME}

# Configuration file을 다운로드 받습니다.
wget -O kfctl_aws.yaml $CONFIG_URI
1.3 IAM Role for Service Account
여러분이 kubectl로 명령을 내릴때는 kubernetes의 User Account로 접속을 하며, admin User Account를 사용하게 됩니다.
Service Account는 Pods안의 processors가 API Server와 연동이 될 수 있는데, 이때 사용되는 것이 Service Account입니다.
IAM Role을 사용해서 Service Account를 관리하겠다는 것은, 따로 node에다가 권한을 줄 필요 없이
kf-admin-${region}-${cluster_name} 그리고 kf-user-${region}-${cluster_name} 에 권한을 줌으로서 권한 관리를 할 수 있다는 뜻입니다.
관련 문서 AWS IAM Roles for Service Account를 참조 합니다.
$ vi kfctl_aws.yamlIAM Role for Service Account를 사용하기 위해서는 kfctl_aws.yaml 파일을 변경해야 합니다.
enablePodIamPolicy:true로 설정해야 합니다.region: cluster 위치의 region 설정auth.basicAuth.username: 접속할 유저 이메일auth.basicAuth.password: 암호roles- 만약 eksctl를 통해서 cluster를 생성했다면 다음의 명령어로 node group role에 대한 IAM Role을 찾을 수 있습니다.
aws iam list-roles \ | jq -r ".Roles[] \ | select(.RoleName \ | startswith(\"eksctl-$AWS_CLUSTER_NAME\") and contains(\"NodeInstanceRole\")) \ .RoleName" - 정확하게 특정 cluster 의 node group을 확인하고자 할때는 다음과 같이 합니다.
eksctl get nodegroup --cluster=<Cluster Name> -o yaml - eksctl말고 다른 방법으로 cluster를 생성시켰다면 node group 생성시 사용한 IAM Role을 적용하면 됩니다.
본문에서는AI-EKS-Node를 사용했습니다.
- 만약 eksctl를 통해서 cluster를 생성했다면 다음의 명령어로 node group role에 대한 IAM Role을 찾을 수 있습니다.
plugins:
- kind: KfAwsPlugin
metadata:
name: aws
spec:
auth:
basicAuth:
password: 1234
username: a141890@gmail.co
enablePodIamPolicy: true
region: us-east-2
roles:
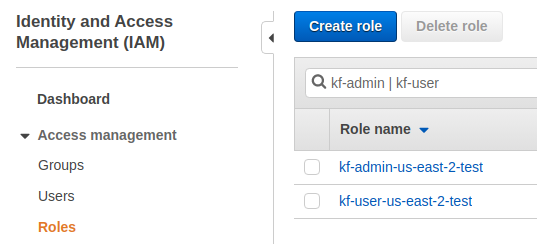
- AI-EKS-Node아래쪽 1.4 에서 kfctl apply -V -f kfctl_aws.yaml 실행하고 나면,
다음 2개의 roles 그리고 service accounts 가 자동으로 생성됩니다.
다시 말하지만 자동으로 생성되기 때문에 따로 만들 필요 없습니다.
- IAM Roles
kf-admin-${region}-${cluster_name}kf-user-${region}-${cluster_name}
- Kubernetes Service Accounts
kf-adminkf-user
확인은 IAM -> Roles 그리고 kubectl 명령어로 확인 가능합니다.
$ kubectl get serviceaccounts -n kubeflow | grep ^kf
kf-admin                                      1         47m
kf-user                                       1         47m
1.4 Deployment of Kubeflow
kfctl_aws.yaml 수정도 완료되었다면, deploy시키고 이후 확인까지 마침니다.
$ kfctl apply -V -f kfctl_aws.yaml
$ kubectl -n kubeflow get all
$ kubectl -n kubeflow get pods
NAME                                                     READY   STATUS    RESTARTS   AGE
admission-webhook-bootstrap-stateful-set-0               1/1     Running   2          20m
admission-webhook-deployment-5bc5f97cfd-p9vlp            1/1     Running   3          18m
alb-ingress-controller-5b777c5cc7-gdsth                  1/1     Running   0          18m
application-controller-stateful-set-0                    1/1     Running   0          22m
argo-ui-669bcd8bfc-vv562                                 1/1     Running   0          18m
cache-deployer-deployment-b75f5c5f6-2wz84                2/2     Running   1          18m
cache-server-85bccd99bd-x2f5c                            2/2     Running   0          18m
centraldashboard-68965b5d89-qmccs                        1/1     Running   0          18m
jupyter-web-app-deployment-5b96b8c459-kmnhv              1/1     Running   0          18m
katib-controller-76b78f5db-hh4t4                         1/1     Running   1          18m
katib-db-manager-67c9554b6d-g5ll5                        1/1     Running   1          18m
katib-mysql-5754b5dd66-f8nrz                             1/1     Running   0          18m
katib-ui-844b4fc655-566bn                                1/1     Running   0          18m
kfserving-controller-manager-0                           2/2     Running   0          16m
kubeflow-pipelines-profile-controller-65b65d97bb-9xk4p   1/1     Running   0          18m
metacontroller-0                                         1/1     Running   0          20m
metadata-db-695fb6f55-7bpqk                              1/1     Running   0          18m
metadata-deployment-7d77b884b6-kmx58                     1/1     Running   1          18m
metadata-envoy-deployment-c5985d64b-95gc5                1/1     Running   0          18m
metadata-grpc-deployment-9fdb476-jz8mx                   1/1     Running   4          18m
metadata-ui-cf67fdb48-gnpt6                              1/1     Running   0          18m
metadata-writer-59d755696c-766h8                         2/2     Running   0          18m
minio-6647564c5c-qbd8v                                   1/1     Running   0          18m
ml-pipeline-6bc56cd86d-gnb74                             2/2     Running   3          18m
ml-pipeline-persistenceagent-6f99b56974-tx4gn            2/2     Running   0          18m
ml-pipeline-scheduledworkflow-d596b8bd-6lk56             2/2     Running   0          18m
ml-pipeline-ui-8695cc6b46-bptd9                          2/2     Running   0          18m
ml-pipeline-viewer-crd-5998ff7f56-h8pwq                  2/2     Running   2          18m
ml-pipeline-visualizationserver-cbbb5b5b-hktzs           2/2     Running   0          18m
mpi-operator-c747f5bf6-rnnqt                             1/1     Running   0          18m
mxnet-operator-7cd59d475-mmkrc                           1/1     Running   0          18m
mysql-76597cf5b5-b2qv7                                   2/2     Running   0          18m
notebook-controller-deployment-756587d86-bxrqf           1/1     Running   0          18m
nvidia-device-plugin-daemonset-9x2c2                     2/2     Running   0          17m
nvidia-device-plugin-daemonset-bwltc                     2/2     Running   0          17m
nvidia-device-plugin-daemonset-llpm9                     2/2     Running   0          12m
nvidia-device-plugin-daemonset-vrhhh                     2/2     Running   0          17m
profiles-deployment-65fcc9c97-d7j8x                      2/2     Running   0          18m
pytorch-operator-5db58565b-zkrbl                         1/1     Running   0          18m
seldon-controller-manager-6ddf664d54-vkq86               1/1     Running   0          18m
spark-operatorsparkoperator-85bbf89886-qm297             1/1     Running   0          20m
spartakus-volunteer-7566cfd658-phbrm                     1/1     Running   0          16m
tensorboard-79bdbb4866-gkk6w                             1/1     Running   0          16m
tf-job-operator-5bf84768bf-q67t2                         1/1     Running   0          18m
workflow-controller-54dccb7dc4-pjgkl                     1/1     Running   0          18m
1.5 Auth Dex 에러 in Kubernetes 1.21
Kubernetes 1.21에서 Auth dex 이슈가 있습니다.
이 문제가 해결되면 istio-system namespace 에서 발생하면 authservice-0 pod 이 죽는 문제도 동시에 해결이 됩니다.
$ kubectl get pods -n auth
NAME                   READY   STATUS             RESTARTS   AGE
dex-6df48678bf-vx5vn   0/1     CrashLoopBackOff   3          70s

# 아래와 같은 에러 메세지
$ kubectl logs -n auth dex-6df48678bf-vx5vn
failed to initialize storage: failed to inspect service account token: jwt claim "kubernetes.io/serviceaccount/namespace" not found
Kubernetes 1.21 에서 dex 에서 jwt 파싱관련된 문제가 있었으며, 해결방법은 다음과 같이 합니다.
# Edit
$ kubectl edit deployments -n auth dex

# 아래와 같이 env 를 추가합니다.
spec:
  template:
    spec:
      containers:
        - name:dex
          env:
          - name: KUBERNETES_POD_NAMESPACE
            valueFrom:
              fieldRef:
                apiVersion: v1
                fieldPath: metadata.namespace
문제 해결
$ kubectl get pods -n auth
NAME                   READY   STATUS    RESTARTS   AGE
dex-666b85fbb7-2lfpq   1/1     Running   0          6m29s
1.5 Kubeflow Dashboard
$ kubectl get ingress -n istio-system
NAME            HOSTS   ADDRESS                                                                  PORTS   AGE
istio-ingress   *       d87f7e0c-istiosystem-istio-2af2-1299484680.us-east-2.elb.amazonaws.com   80      112m
만약 ADDRESS가 None일 경우 port-forward로 접속합니다.
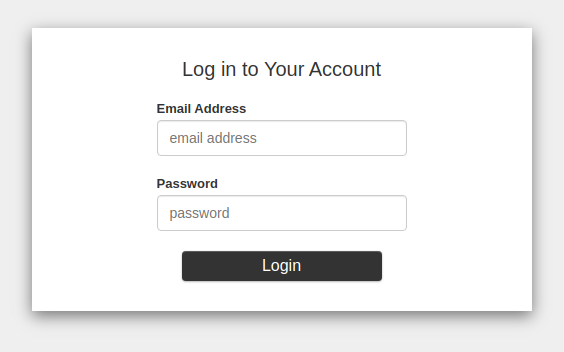
$ kubectl port-forward -n istio-system svc/istio-ingressgateway 8080:80위의 ADDRESS 주소를 chrome에서 확인합니다
2. Configuration
2.1 Add Static User for Basic Authentication
만약 basic authentication을 사용했고 유저를 추가하고자 한다면 Dex ConfigMap 을 수정하면 됩니다.
kubectl edit configmap dex -n auth자세한 내용은 링크 참조
2.2 Kubeflow Gateway Configuration
Dashboard 접속 정보를 여기에서 바뀔수 있습니다.
$ kubectl edit gateway kubeflow-gateway -n kubeflow -o yaml2.3 EKS Security Group Configuration (Optional)
- 자세한 내용은 Amazon EKS Security Group Consideration 참조
다음의 명령어로 cluster security group을 확인 할 수 있습니다.
또는 콘솔에서는 EKS -> Clusters ->
$ aws eks describe-cluster --name <cluster_name> --query cluster.resourcesVpcConfig.clusterSecurityGroupId
sg-0e06dcf009caa37bd
Security Group은 기본적으로 다음과 같이 설정이 되어 있습니다.
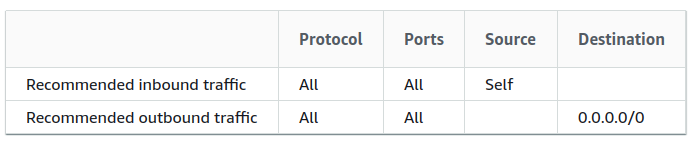
추가적으로 특정 Port만 열도록 production에서는 수정이 필요합니다.
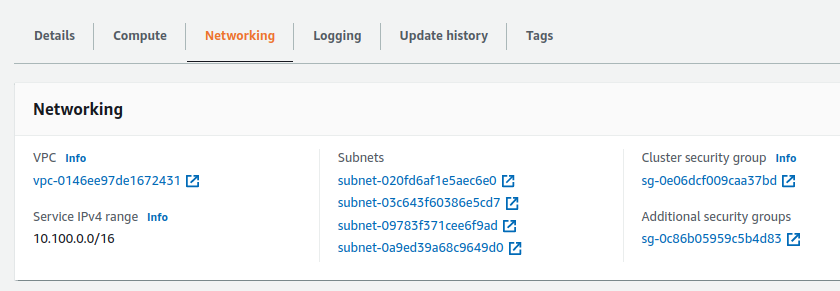
2.4 Control Plane Security Group Configuration (Optional)
Control plane security group은 Control plane 과 nodes 사이에서의 통신을 제한하는데 사용합니다.
해당 security group은 콘솔 Networking 에서 Additional security groups 이라는 이름으로 찾을 수 있습니다.
또는 아래의 명령어로 찾을 수 있습니다.
$ aws eks describe-cluster --name <cluster_name> --query cluster.resourcesVpcConfig.securityGroupIds
[
    "sg-0c86b05959c5b4d83"
]
일단 중요한 점은 해당 Security Group을 다른 Cluster와 사용하면 안됩니다.
통신이 막힐수도 있고 장애가 발생할 수 있습니다.
반드시 Cluster마다 각각의 Security Group을 지정해 줘야 합니다.